Camera Date: Follow It Through

Your Goal Today
Your goal today is to leave with one Keeper that clearly communicates motion, while understanding which shutter speed, tracking technique, background, timing, and framing decisions made it work.
This Camera Date is not about pointing the camera at something moving, holding down the shutter, and hoping one frame looks interesting. You are going to build the photograph deliberately. You will make a Baseline, test one variable at a time, diagnose what happens, protect what works, and keep refining until you have a photograph you genuinely want to keep.
The subject doesn't need to be dramatic. A cyclist making loops, a runner on a track, a dog chasing a ball, a child on a bicycle, skateboarders at a park, or cars passing through the same stretch of road can all work. What matters most is repetition. You need enough opportunities to try something, evaluate the result, make a deliberate change, and try again.
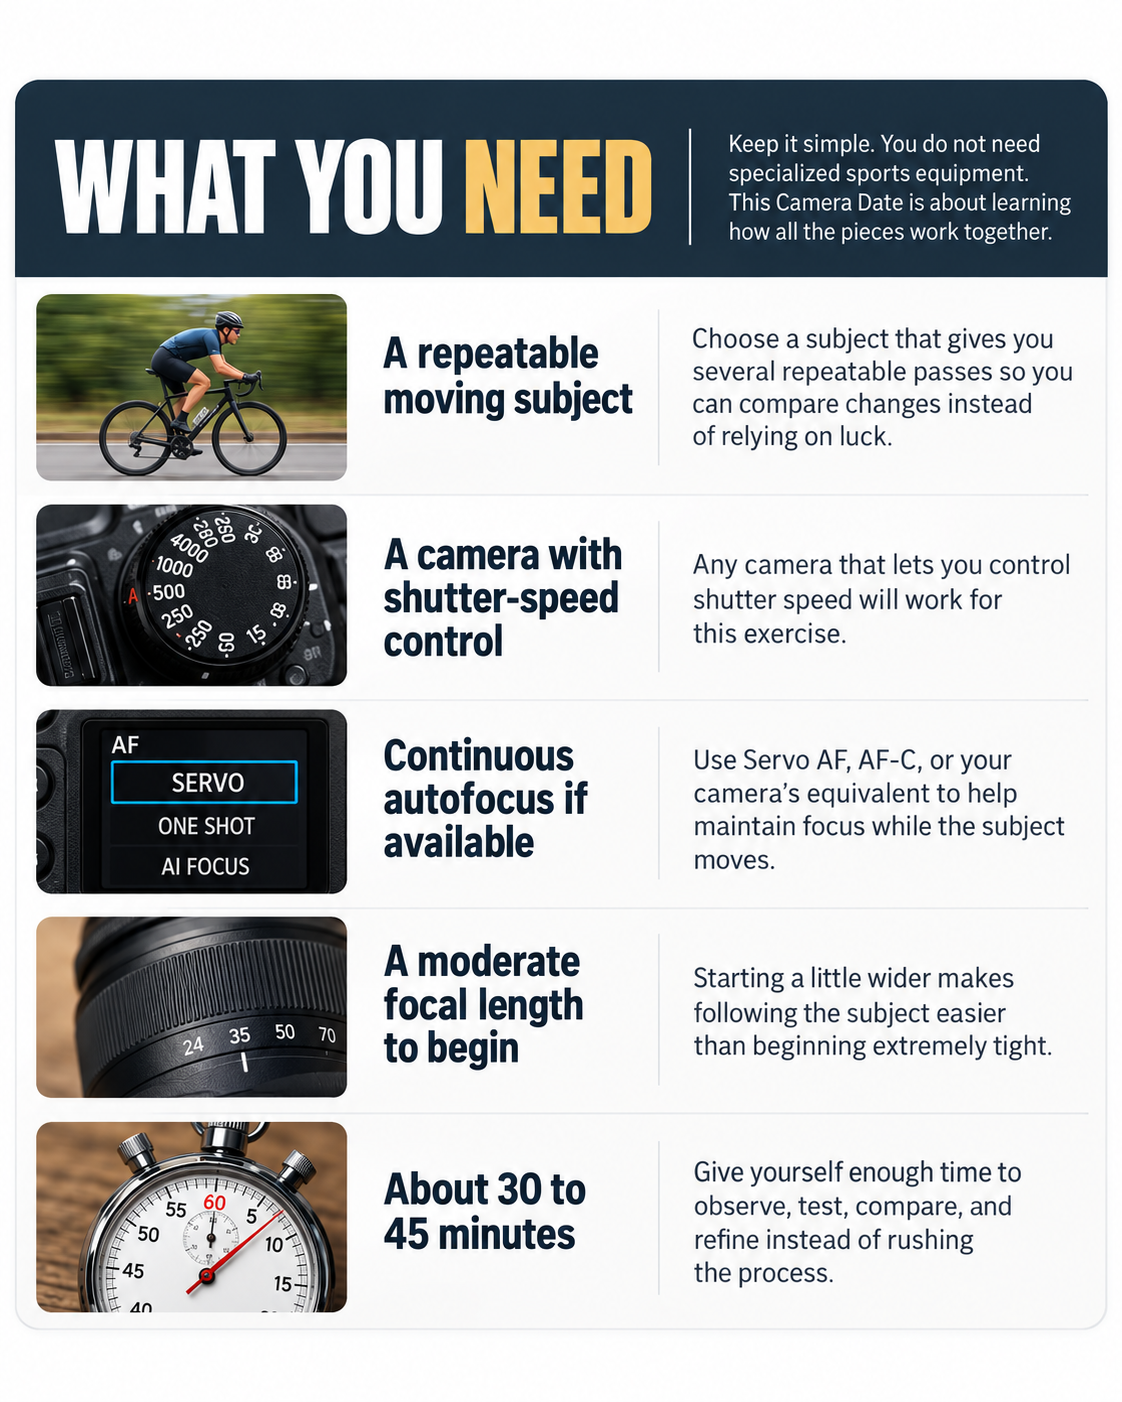
You do not need anything specialized for this Camera Date. The goal is not to test how sophisticated your autofocus system is. It is to learn how your own movement, shutter speed, timing, background, framing, and subject work together. Pay attention to what changes from one pass to the next, and let each attempt tell you what to adjust before you shoot again.
Step 1: Arrive and Listen
Before you touch the shutter, spend a few minutes watching. This is where LENS begins. Listen to the scene before deciding what to do. Watch the path your subject takes. Notice where it speeds up, slows down, turns, enters better light, or passes in front of a cleaner background. Pay attention to what happens behind the subject as it moves. Look for poles, signs, parked cars, bright patches, dark areas, repeating lines, strong colors, and places where important shapes begin overlapping.
Then Explore. Move a few feet left or right. Try a slightly lower or higher viewpoint. Look through the viewfinder without making photographs and follow the subject through the scene. You are searching for a part of the path where the light, background, direction of movement, and available space can all work together.
Once you find something promising, stop wandering. This is where you begin to Nurture the idea. Give one setup enough time to teach you something instead of immediately abandoning it for the next possibility. You have now worked through the first three parts of LENS: (Listen, Explore, Nurture). The S (shoot) comes next, but only after you decide where the photograph has the best chance of happening. That is what the next step is for.
Step 2: Find Your Background Runway
Before the subject arrives again, identify your Background Runway. This is the specific stretch of the subject’s path where you want the strongest photograph to happen. It might be twenty feet of dense trees, a brightly colored wall, a fence with repeating vertical lines, a section of road receiving clean light, or simply an area where distracting objects disappear. The exact length is not important. What matters is identifying the place where the background gives your moving subject the strongest visual opportunity.
Watch one or two passes without pressing the shutter. Notice exactly where the subject enters the Runway and where it leaves. Look for the moment when Shape Separation is strongest, and Frame Competition is weakest.
Decide where the photograph should happen before you ask yourself when to press the shutter. Prediction makes execution much easier.
Step 3: Set Up and Make the Baseline
Now comes the S in LENS: Shoot. You have listened to the scene, explored the possibilities, and nurtured one promising setup. Now it's time to take the first deliberate photograph and establish your Baseline.
Begin with settings that give you a strong chance of making a clean, straightforward photograph. Use continuous autofocus if your camera offers it. On Canon, Servo AF is a good starting point. If subject detection works reliably for what you are photographing, use it.
Choose a moderate focal length rather than beginning extremely tight with a long telephoto lens. The tighter your framing becomes, the more noticeable small tracking errors will be. Starting slightly wider gives you room to develop the movement first.
For the Baseline, use a shutter speed fast enough to freeze or nearly freeze your subject. Around 1/500 second might be reasonable for a cyclist or runner, depending on speed, distance, and focal length. The exact number does not matter yet. Motion blur is not the goal of this first frame.
Now make your Baseline. Track the subject through your Background Runway and make several photographs during the strongest part of the pass. Do not intentionally create a weak image. Make a photograph you would have considered respectable before beginning this Camera Date.
Evaluate the Baseline
When the subject has passed, stop photographing and look closely at your strongest frame. Check whether the subject is readable and whether its placement feels intentional. Look for Frame Competition in the background. Examine Breathing Space ahead of the movement and any Edge Pressure near the frame boundaries. Check Shape Separation and follow the Visual Path through the image.
Then answer one question before changing anything: What is the single biggest thing I want to improve? It might be the sense of motion. It might be the background. It might be framing, spacing, separation, or timing. Name the problem before choosing the solution.
Step 4: Run the Three-Pass Calibration
Before you begin refining the photograph, create three deliberately different versions of the same movement. Think of these as visual reference points.
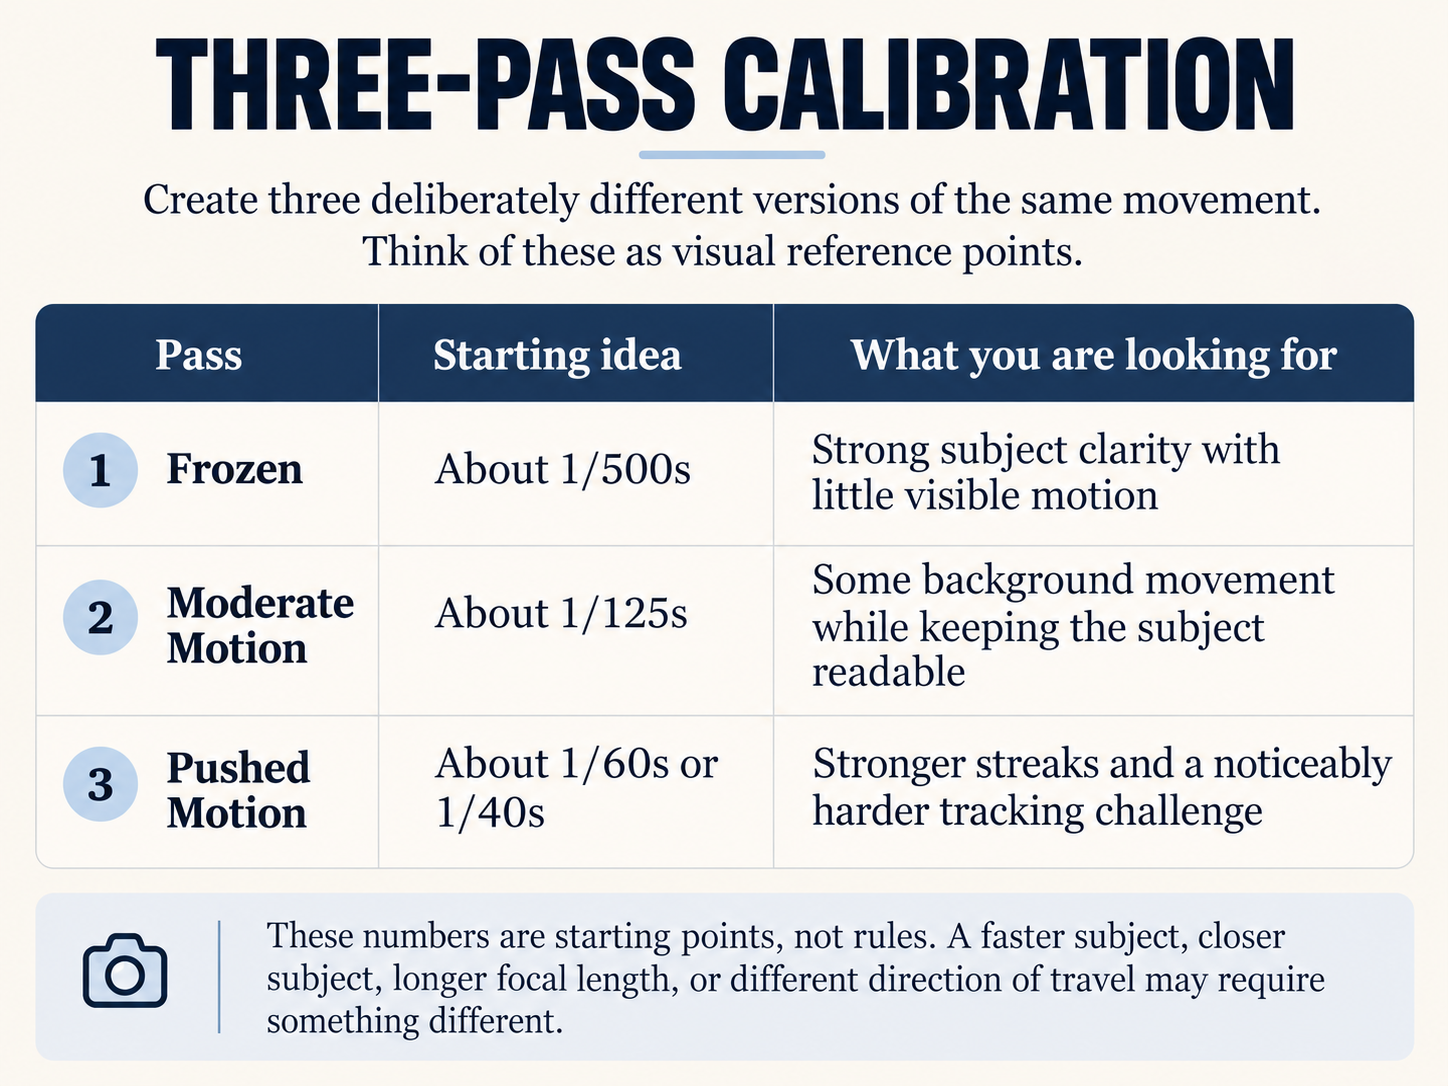
Keep your position, focal length, and general composition as consistent as reasonably possible. Make shutter speed the main variable during this test. Make several attempts at each setting, then choose the strongest frame from each pass and compare the three together. You are no longer guessing what shutter speed does. You can see it.
Step 5: Pick an Anchor Point and Refine Your Body Mechanics
Before the next pass, choose one meaningful part of the subject to use as your Anchor Point. For a cyclist, that might be the helmet, face, or upper chest. For a runner, it might be the head or center chest. For a car, it could be the front headlight or driver’s window.
Your goal is to keep that Anchor Point in roughly the same place in your viewfinder while the subject moves through the Background Runway. This gives your body something specific to follow instead of vaguely tracking the entire subject.
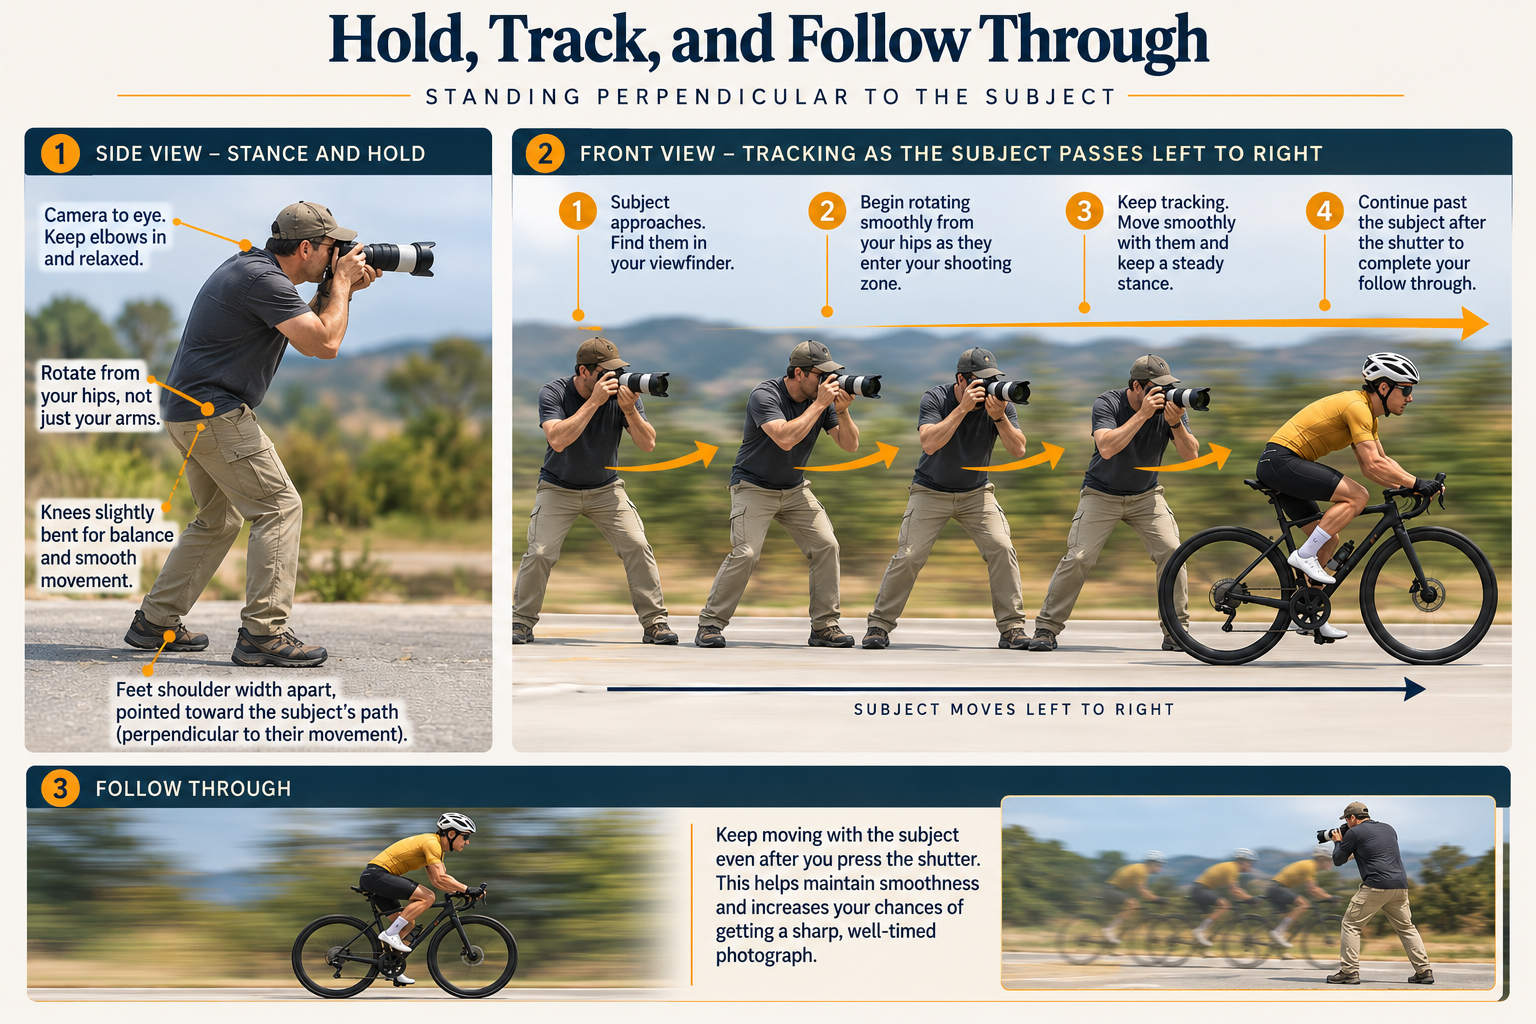
Stay relaxed through your shoulders. Keep your elbows comfortably tucked rather than held rigidly away from your body. Begin following the subject before it reaches your Background Runway, and rotate smoothly through your hips and torso rather than trying to steer entirely with your wrists.
Make the exposure while that smooth motion is already happening, then continue following after the shutter closes. Do not suddenly stop your body when you press the shutter.
The photograph happens inside the movement.
Step 6: Call the Shot
From this point forward, tell yourself what each important attempt should accomplish before you make it. You might decide, “This pass is about keeping the rider’s helmet readable while getting stronger background streaks.” Another pass might be about creating more Breathing Space ahead of the subject. Another could be entirely about smoother Anchor Point tracking.
This is Call the Shot.
It prevents you from randomly changing settings and hoping something improves. When the subject passes, you know exactly what you were testing, so you can evaluate whether the photograph actually accomplished it. Say it out loud if it helps. If people nearby start staring, you can always pretend you were talking to the camera. 😉
Step 7: Work the Shutter Ladder
Now begin refining shutter speed deliberately. A useful progression for a cyclist might look like this:
| Round | Example shutter speed | Main question |
|---|---|---|
| A | 1/125s | Is there enough motion to change the feeling of the photograph? |
| B | 1/80s | Can I keep the subject readable while increasing the streaks? |
| C | 1/60s | Does the extra movement improve the photograph or begin weakening the subject? |
| D | 1/40s | Is this controlled motion or simply too much blur for my current tracking? |
Stay at each shutter speed long enough to make at least three or four serious attempts. Panning depends heavily on body movement and timing, so one poor frame does not tell you whether a setting works. At each speed, choose your strongest photograph before moving on.
When you finish the ladder, put those winners against each other in a Shutter Tournament. The slowest shutter doesn't automatically win, and the sharpest photograph doesn't automatically win. Look for the frame where subject readability and intentional motion work together most convincingly. That becomes your current working shutter speed.
Step 8: Read the Streaks
Now stop concentrating primarily on the subject and study the background. Look at what happened to trees, fences, walls, signs, lights, road surfaces, and areas of color. Did repeating vertical lines create rhythm? Did foliage become smooth bands of color? Did a bright sign become an ugly streak that pulls attention away from the subject? Ask whether the background increases Subject Weight or creates Frame Competition.
If the subject looks good but the background does not, do not automatically change shutter speed. Move yourself instead. A small position change might completely alter the streak pattern without changing the subject or exposure. That is why we diagnose before pulling another Composition Lever.
Step 9: Check Shape Separation and Refine the Space
A moving subject can pass through several completely different compositions in a single second. The rider’s head may briefly cross a dark tree. A runner may merge with a parked car. A bicycle wheel may disappear against a fence.
Look carefully at Shape Separation through your entire Background Runway. You may discover that the strongest photograph does not occur in the middle of the Runway at all. It may happen slightly earlier or later when the subject separates cleanly from the background.
Now pay attention to the space around the movement. Make one short series with generous Breathing Space in front of the subject, then another with stronger Edge Pressure toward the direction of travel.
Compare them. More room ahead may create a feeling of continuation and freedom. Strong Edge Pressure may create urgency, compression, or speed. Neither treatment is automatically correct. Decide what the space contributes to the photograph you are trying to make.
Step 10: Build a Failure Library
Do not immediately delete every photograph that fails. Keep a small selection of useful mistakes from this Camera Date. Save one where your tracking failed. Save one where the shutter speed was too fast, and the movement feels static. Keep one where the subject disappeared into excessive blur. Keep another where Shape Separation failed, or Edge Pressure ruined the framing. These photographs become your Failure Library.
The point is not to collect bad photographs. The point is to learn what specific problems look like. The faster you recognize a failure, the faster you can select the right Composition Lever in the field.
Step 11: Field Diagnostics Quick Guide
When the photograph isn't working, don't start twisting dials randomly. First determine what the photograph is telling you.
| What You See | Likely Diagnosis | What to Try Next |
|---|---|---|
| Everything is smeared in the same direction | Tracking speed or body movement does not match the subject | Begin tracking earlier, relax, hold the Anchor Point more consistently, and smooth your torso rotation |
| Subject is sharp but the frame feels static | Shutter speed is too fast for the motion you want | Step farther down the Shutter Ladder |
| Background looks great but the subject disappears | Shutter is slower than your current tracking can support | Increase shutter speed slightly or improve Anchor Point tracking |
| Subject repeatedly merges with poles, trees, cars, or signs | Shape Separation problem | Change timing, camera position, height, or Background Runway |
| Subject feels cramped or repeatedly gets cut off | Framing and anticipation problem | Start tracking earlier and adjust Breathing Space or Edge Pressure |
| Autofocus repeatedly lands behind the subject | Focus acquisition or tracking problem | Revisit AF mode, subject detection, focus area, or when you acquire the subject |
| Background remains distracting even when blurred | Background selection problem | Change your physical position rather than changing exposure |
The habit matters more than memorizing the chart. Learn to look at a weak photograph and ask what kind of problem you are actually seeing.
Diagnose first. Pull the lever second.
Step 12: Nurture What Is Working
You have explored enough. By now you should know which Background Runway works best, which shutter-speed range gives you the movement you want, where your subject separates most clearly, and how much Breathing Space or Edge Pressure fits the photograph. This is where Nurture becomes especially important. Stop changing good decisions just because more options are available.
Choose your strongest current photograph and identify the single biggest thing keeping it from being better. Perhaps the Anchor Point needs more consistency. Maybe the background streaks should be slightly stronger. Perhaps the subject needs another little pocket of Breathing Space.
Protect everything that already works and change only that weakness. Call the Shot, then try again.
Step 13: Choose the Keeper Candidate
Review the strongest photographs from the session. Do not automatically choose the sharpest frame or the one with the most blur. Instead, look at the whole photograph. Is the subject readable enough to anchor the viewer? Does the background support the motion rather than compete with it? Does the Visual Path reinforce the direction of movement? Is Shape Separation strong? Do Breathing Space and Edge Pressure feel deliberate? Does the blur look intentional?
Your strongest current photograph becomes the Keeper Candidate. You are close, but do not quit yet.
Step 14: Make the Final Push
Study the Keeper Candidate and identify the single weakest remaining relationship. Keep the answer small. Maybe the rider needs slightly more room ahead. Perhaps the face needs a touch more readability. Maybe moving three feet gives you a cleaner streak behind the subject. Perhaps you can slow the shutter one small step without losing the Anchor Point.
Choose one change and make another short series. Do not rebuild the entire photograph. Protect what works. Fix what does not. Then compare the new frames directly against the Keeper Candidate. If one is stronger, promote it. If none improves the photograph, keep the earlier frame. More attempts do not automatically mean more progress.
Step 15: Prove the Keeper
Before you finish the Camera Date, make sure you understand why your Keeper works.
What does the motion in this photograph communicate?
Which Composition Lever made the biggest improvement?
What would you repeat the next time you photograph motion?
You do not necessarily have to write the answers down. Saying them clearly to yourself is enough. If you can explain what you wanted, what you changed, and why the final photograph is stronger, you did more than get lucky.
Congratulations! You taught yourself something.
Level Two Variants
Once you have a Keeper, the main Camera Date is complete. If you are enjoying the exercise and want another challenge, choose one of these rather than starting the entire process over.
Push the Shutter by taking your Keeper setup one full stop slower and seeing how far you can stretch the motion before subject readability collapses. The Keeper does not have to change. You are simply discovering the edge of your control.
Change the Runway by keeping your subject and working shutter speed similar while finding a completely different background. Look for different colors, lighting, lines, or visual rhythm and see how dramatically the photograph changes.
Change the Path by finding movement that travels diagonally or along a curve rather than straight across the frame. Notice how prediction, framing, autofocus, and Anchor Point tracking become more complicated.
Go Longer by repeating the exercise with a longer focal length. Notice how much more obvious small tracking errors become and how the narrower field of view changes Breathing Space and anticipation.
What You Just Taught Yourself
You didn't just learn how to pan a camera. You walked through a complete Camera Dates field process. You arrived and listened. You explored the scene and found a Background Runway. You made a respectable Baseline instead of intentionally making something bad. You calibrated shutter speeds and chose an Anchor Point. You Called the Shot, worked a Shutter Ladder, studied the background, evaluated Shape Separation, experimented with Breathing Space and Edge Pressure, built a Failure Library, and diagnosed problems before changing anything.
Then you stopped exploring and nurtured what was working. You chose a Keeper Candidate, protected its strengths, made one final deliberate push, and proved to yourself that you understood how the photograph came together.
That is the larger habit Camera Dates is building. The subject will change. The lesson will change. The Composition Lever may be completely different next week. But the process can become familiar enough that eventually you can walk outside with your camera, decide to have a Camera Date, and know how to teach yourself from there.
Remember LENS: Listen. Explore. Nurture. Shoot. Make the Baseline, diagnose what the photograph needs, choose the right lever, compare the result, refine it, and keep working until you have a Keeper you understand.
That is how you learn photography in the field.